Easily add business logic to your website
In the blog post Create your first website with open bi CMS I described how to build your web project from scratch. At the end of the post, we have already used some basic HTML Items, which open bi provides to create:
- navigation bars
- sitemaps
- optional footerbars for imprint, contact etc.
This blog post is now intended to introduce you more in depth to HTML Items and what you can do with them.
Introduction to HTML Items
A full documentation of HTML Items can be found here. Bascially, HTML Items are designed to help you:
- Simplifying the modelling process by accessing information stored in open bi (e.g. navigation bar or sitemap)
- Using data modelled within open bi on the website (e.g. in lists or input forms)
- Designing interactive processes on the website (e.g. login process, dropbox item)
To enable this, HTML Items provide:
- Logic to access open bi data and to prepare it for display on the website. The <navbar> CMS Item e.g. reads the structure of the CMS role and prepares it for display.
- Predefined actions that can be called when a link is pressed or an AJAX request is started. These actions can then process data or change the rendering of the CMS Item on the server side. The <login> CMS Item e.g. can perform login and logout to the open bi system, and checks the validity of a password.
- CMS Item Templates to define the look and feel of the CMS Item.
Example: Manage Documents
For biExport, one of our many projects based on open bi, the idea was to build a document interface, where so called “Export Templates” could be uploaded, organized, changed and downloaded.
The user should be required to logon before using the UI…
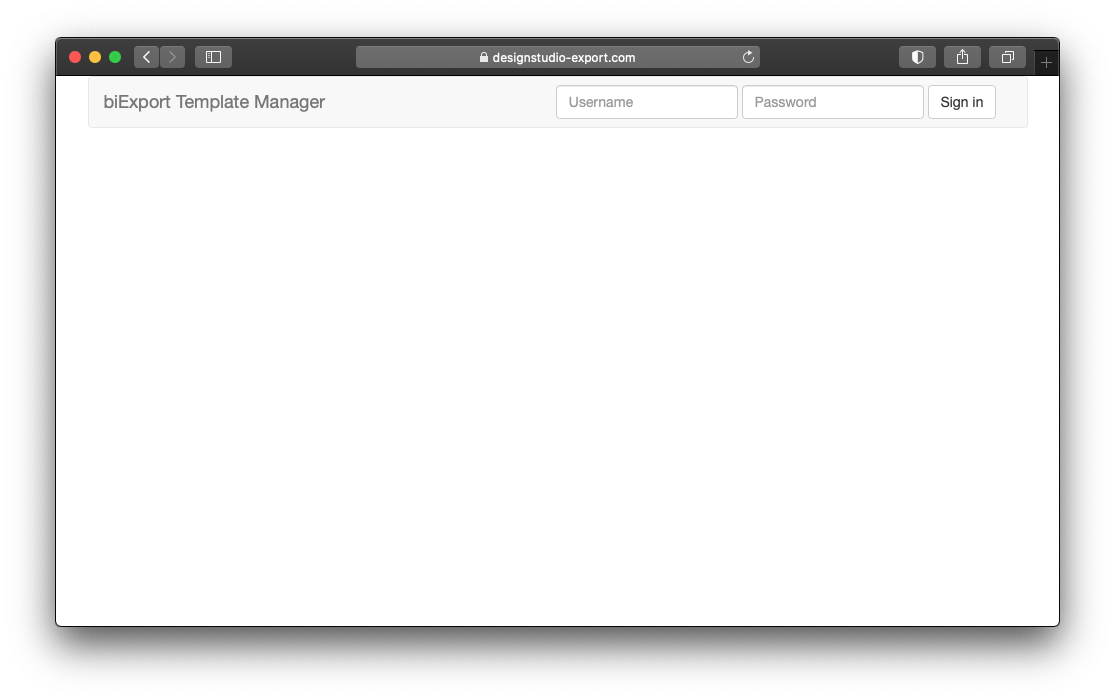
… and the documents should be organized in a dropbox-style UI:
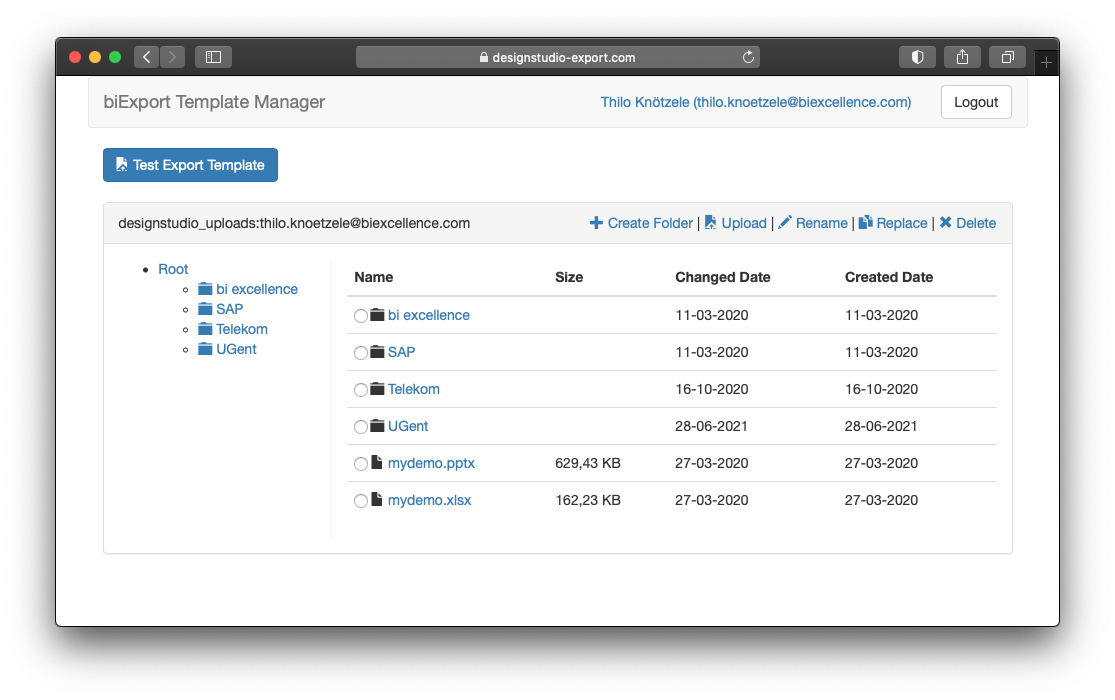
As open bi ships HTML Items for both requirements, we were able to fulfill the requirement with the blink of an eye! See yourself...
The HTML page
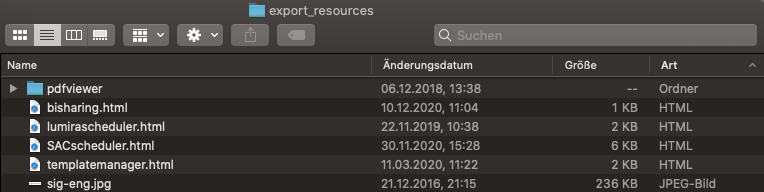
For this specific UI, the requirement has not been to add the document interface to an existing CMS. Rather, a single web page was needed that is automatically published by open bi once installed:
https://designstudio-export.com/export_resources/templatemanager.html
So in this case, the web page is a simple HTML file which has been copied into the export_resources directory of the open bi installation:
The HTML code
Let’s now have a look at the HTML code used to achieve the required UI. You can see that it is basically a standard HTML page with some references in the <head> tag to jquery and bootstrap. In the <body> tag CSS classes of bootstrap are used to generally style the HTML:
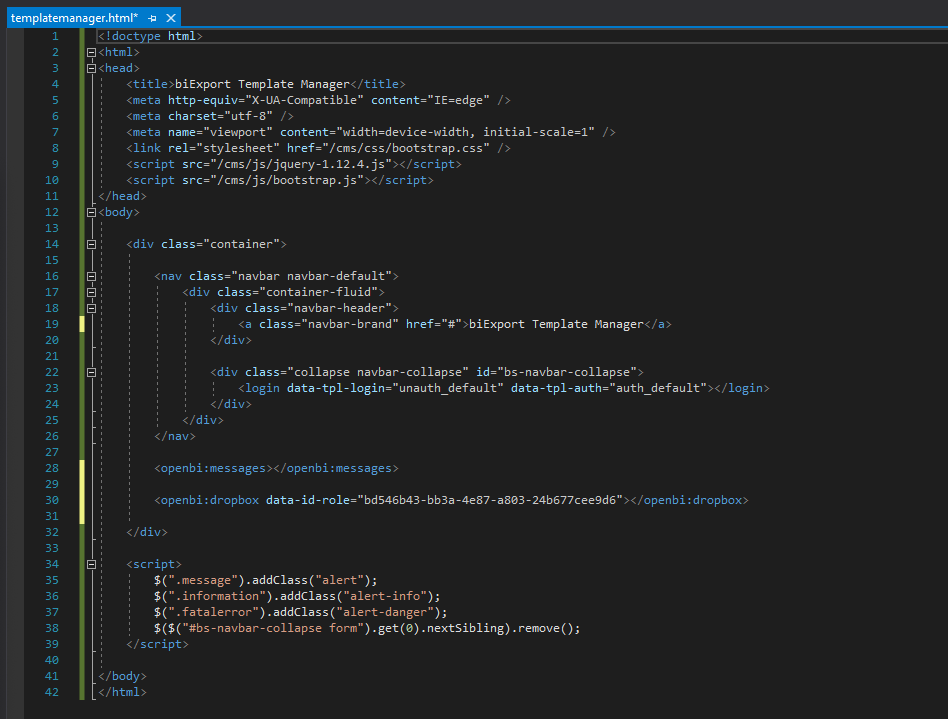
Here is the complete source code:
<!doctype html>
<html>
<head>
    <title>biExport Template Manager</title>
    <meta http-equiv="X-UA-Compatible" content="IE=edge" />
    <meta charset="utf-8" />
    <meta name="viewport" content="width=device-width, initial-scale=1" />
    <link rel="stylesheet" href="/cms/css/bootstrap.css" />
    <script src="/cms/js/jquery-1.12.4.js"></script>
    <script src="/cms/js/bootstrap.js"></script>
</head>
<body>

    <div class="container">

        <nav class="navbar navbar-default">
            <div class="container-fluid">
                <div class="navbar-header">
                    <a class="navbar-brand" href="#">biExport Template Manager</a>
                </div>

                <div class="collapse navbar-collapse" id="bs-navbar-collapse">
                    <login data-tpl-login="unauth_default" data-tpl-auth="auth_default"></login>
                </div>
            </div>
        </nav>

        <openbi:messages></openbi:messages>

        <openbi:dropbox data-id-role="bd546b43-bb3a-4e87-a803-24b677cee9d6" data-requires-auth="true"></openbi:dropbox>

    </div>

    <script>
        $(".message").addClass("alert");
        $(".information").addClass("alert-info");
        $(".fatalerror").addClass("alert-danger");
        $($("#bs-navbar-collapse form").get(0).nextSibling).remove();
    </script>

</body>
</html>
The login and document interface are integrated as HTML Items. For a full documentation on HTML Items and their configuration options see here.
The login
The users, which shall be allowed to log in, are defined as open bi users. This makes it possible to control the whole login and logout process by the <login> CMS Item:
<login data-tpl-login="unauth_default" data-tpl-auth="auth_default"></login>
The document interface
Documents shall be stored in an open bi Document Role. With the <openbi:dropbox> CMS Item you can reference this role to automatically show the documents of the role and add documents to it:
<openbi:dropbox data-id-role="bd546b43-bb3a-4e87-a803-24b677cee9d6" data-requires-auth="true"></openbi:dropbox>
Data-requires-auth is set to "true" in order to ensure the element is only displayed when the user is logged in.
